SSO Configuration Guide for OKTA
Overview
Lookout Cloud Security Platform is a data-centric cloud security solution that protects your users from internet-based threats and protects data stored in cloud applications, private applications, and websites.
The solution supports these important components of cloud security:
- Lookout Secure Internet Access: Protection for web or nonweb internet-based traffic.
- Lookout Secure Private Access: Protection for private application traffic.
- Lookout Secure Cloud Access: Protection for cloud application traffic.
Supported Features
The Okta and Lookout SAML integration currently supports the following features:
- SP-initiated SSO
- IdP-initiated SSO
Enable Enterprise Authentication
Users must authenticate with your enterprise single sign-on provider before you can make use of specific solutions such as Secure Internet Access or Secure Cloud Access. The Lookout Cloud Security Platform leverages the user or user group context to enforce access and activity policies on cloud apps, private apps, and websites.
Gather Service Provider Metadata
To use Okta as an identity provider (IdP), you must capture SAML values from Lookout.
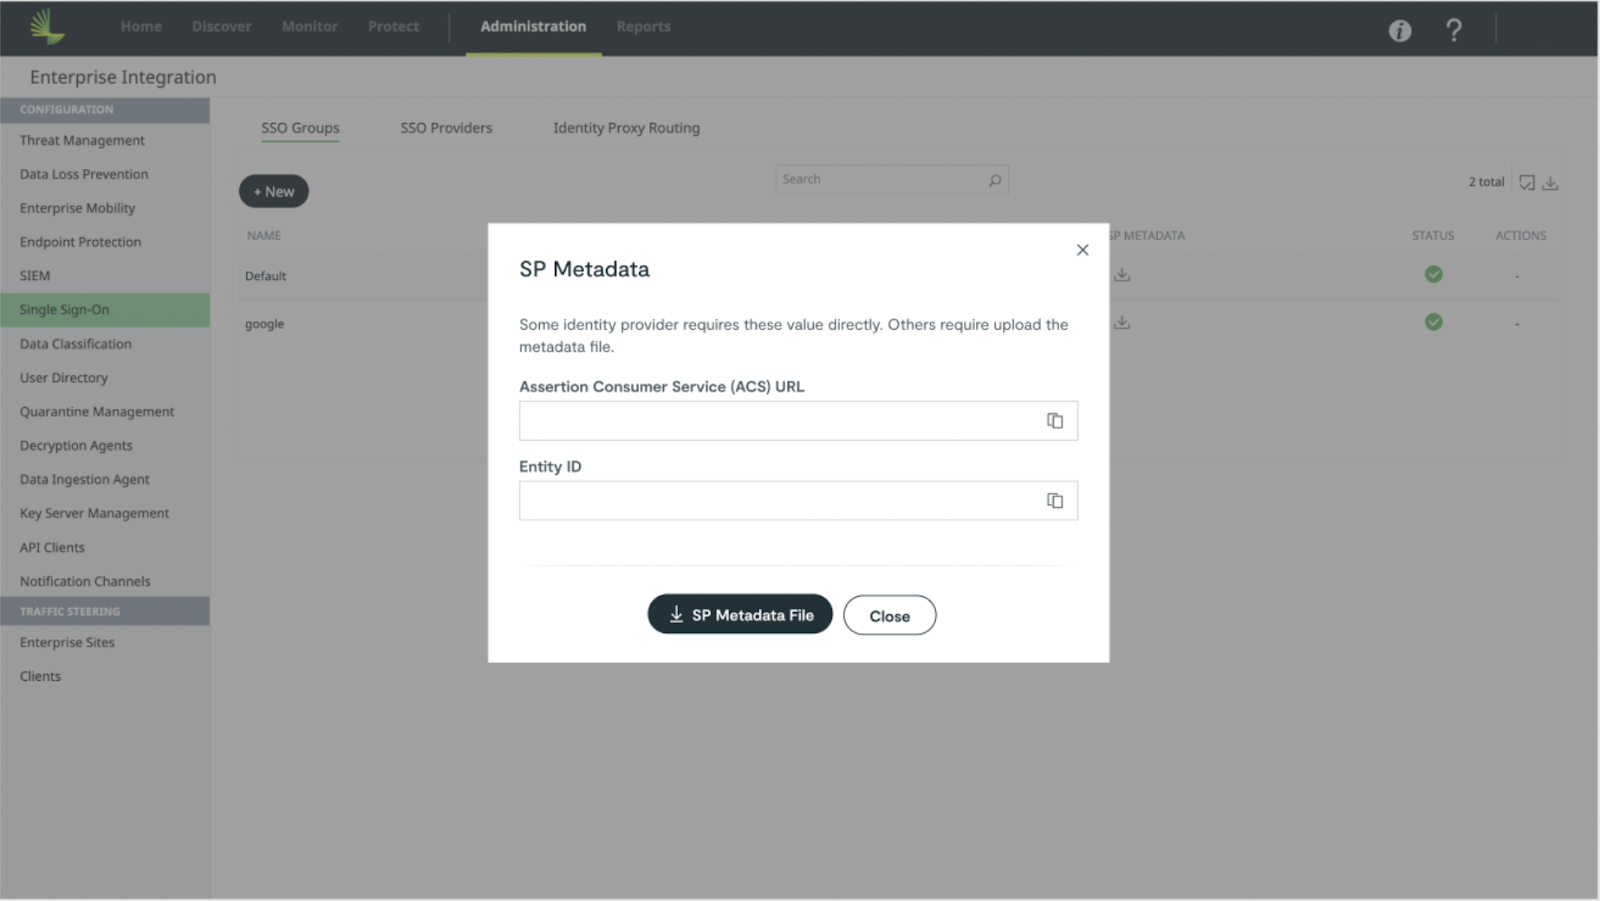
- In the Lookout Management Console, select Administration > Enterprise Integration.
- In the Configuration menu, select Single Sign-On.
- On the SSO Groups tab, click on the download icon of the SP Metadata from the Default group.
- A pop-up appears with SP Metadata details
- Copy the Assertion Consumer Service (ACS) URL and Entity ID
Configure the Identity Provider
Creating a SAML-based application in Okta gives Okta the information it needs to communicate with the Lookout Cloud Security Platform, enabling the platform to enforce policies based on user credentials.
- In the Okta administrative console, select Applications > Browse App Catalog.
- Search for Lookout Secure Access
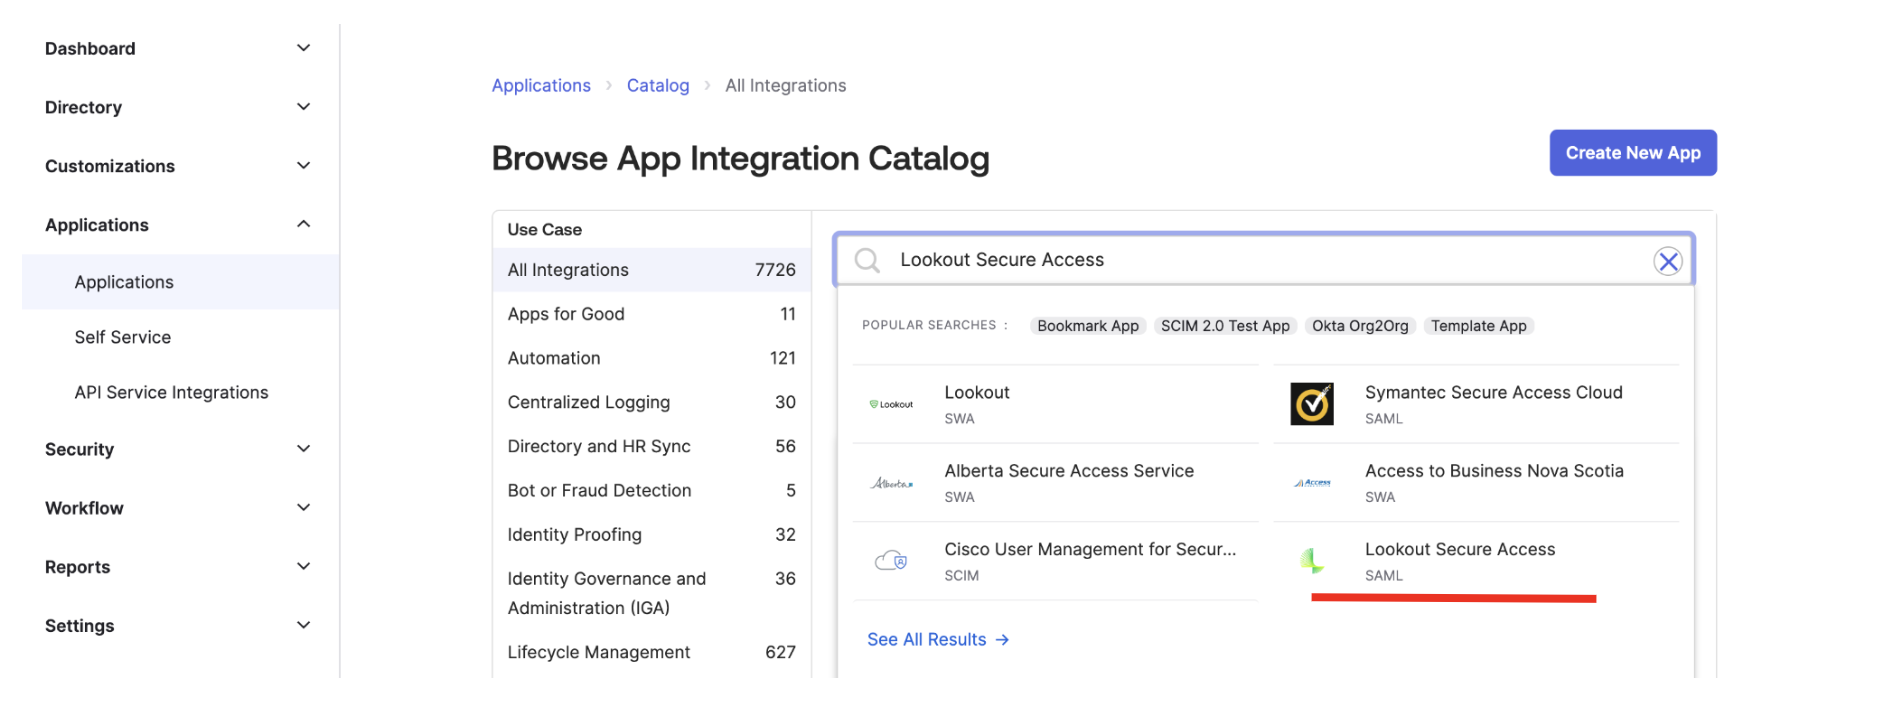
- Click on Lookout Secure Access
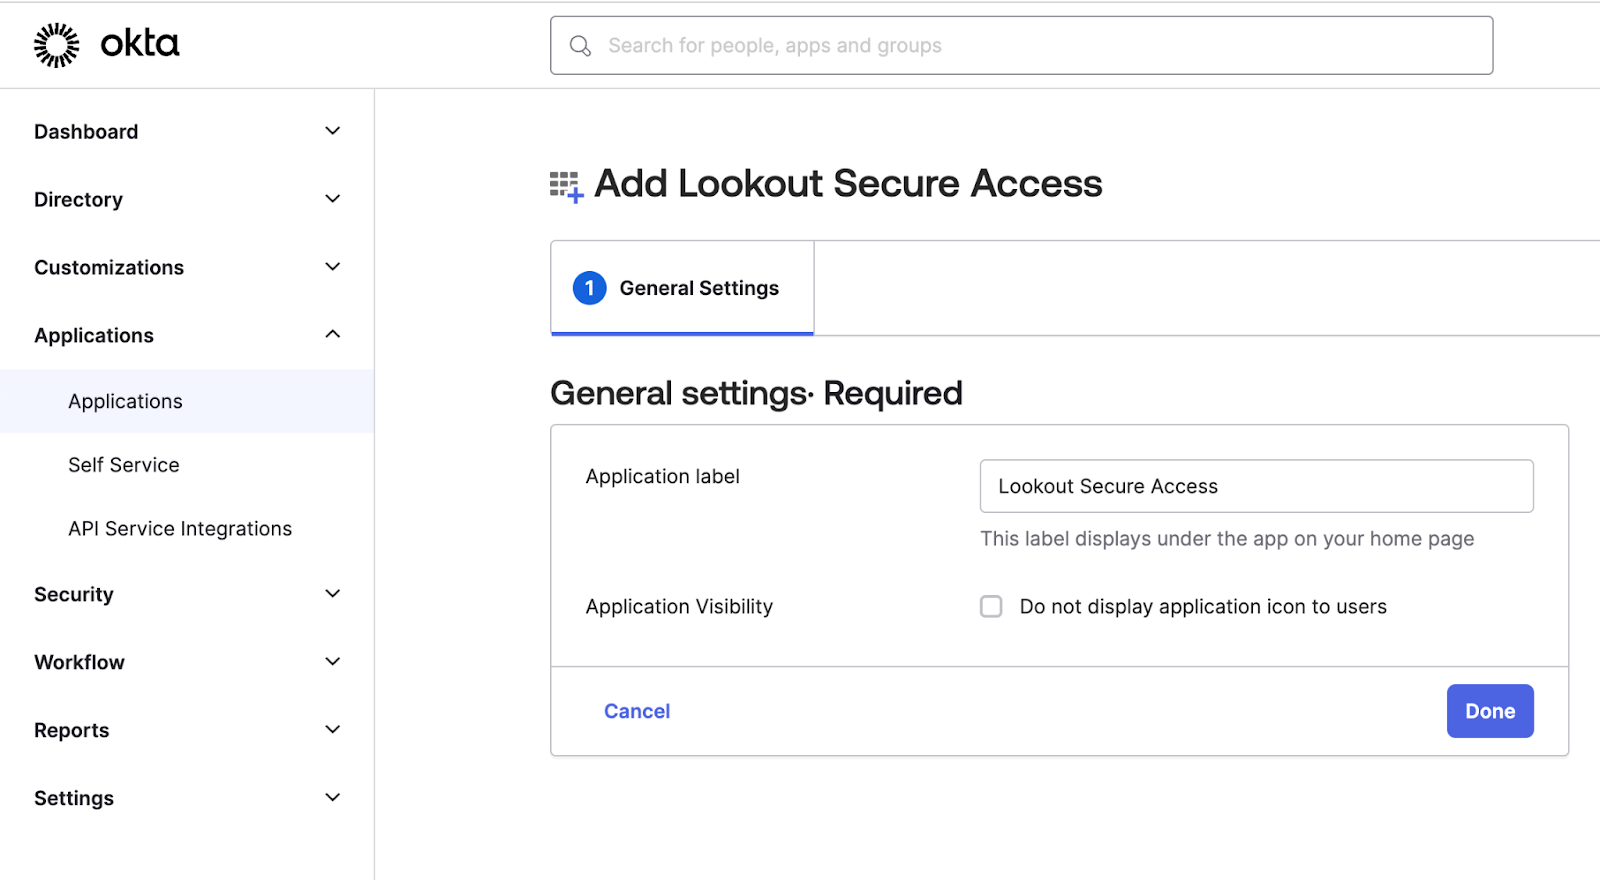
- Click on Add Integration
- On the General Settings tab, click on Done
- On the Sign On tab, click on Edit settings
- Under Advanced Sign-on Settings, configure these values:
- ACS URL: Enter the Assertion Consumer Service value you copied earlier
- EntityID: Enter the Entity ID value you copied earlier
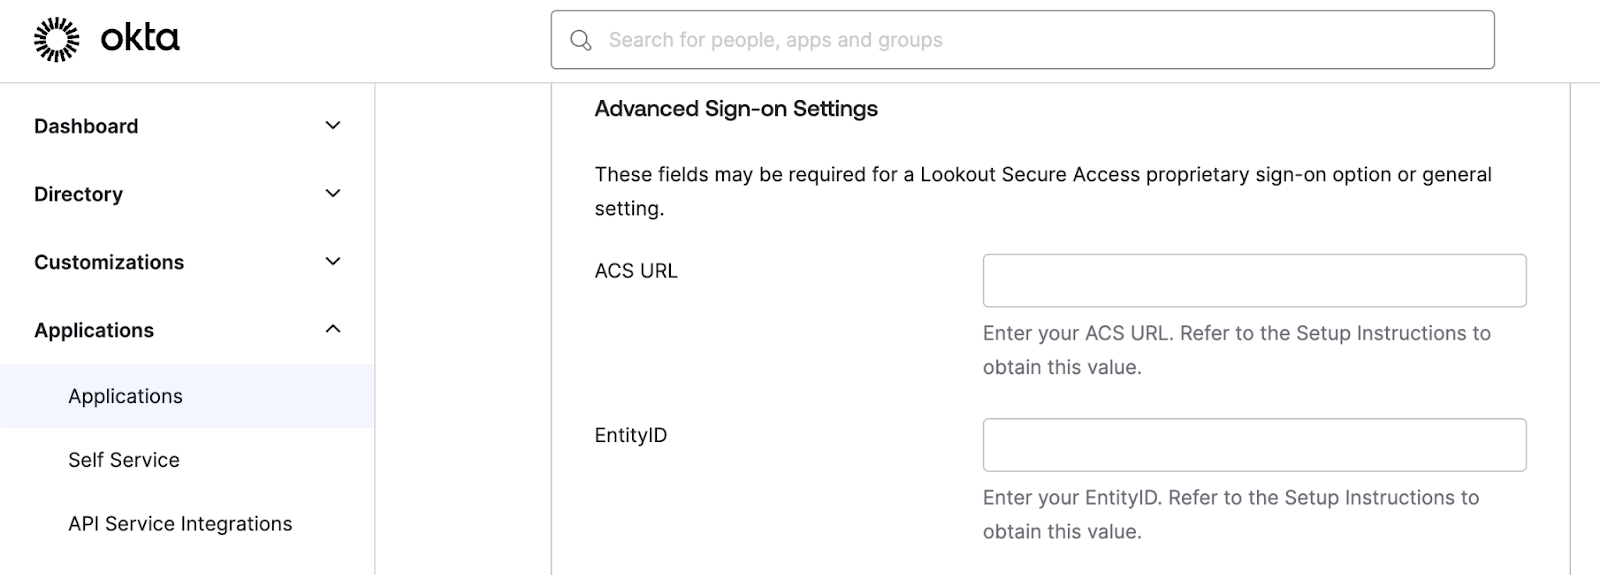
- Click Save.
- On the Sign On tab, in the SAML 2.0 section, copy the Metadata URL to use later.

- On the Assignments tab, select Assign and add the People and Groups.
Configure the Service Provider
You must link your Okta instance to the Lookout Cloud Security Platform by configuring a new IdP instance, which Lookout uses to retrieve user information from Okta.
- In the Management Console, select Administration > Enterprise Integration.
- In the Configuration menu, select Single Sign-On.
- On the SSO Providers tab, click New.
- Enter or select these values:
- Name: Enter a name that contains no more than 255 characters.
- Type: Identity Provider
- SSO Group: Default
- Metadata Link: Use the metadata link copied from the Okta IdP metadata.

- Click Validate and confirm that the Management Console populates the Entity ID field.
- Click Save.
Enable SSO for the Management Console, Endpoint client, and Proxy Authentication
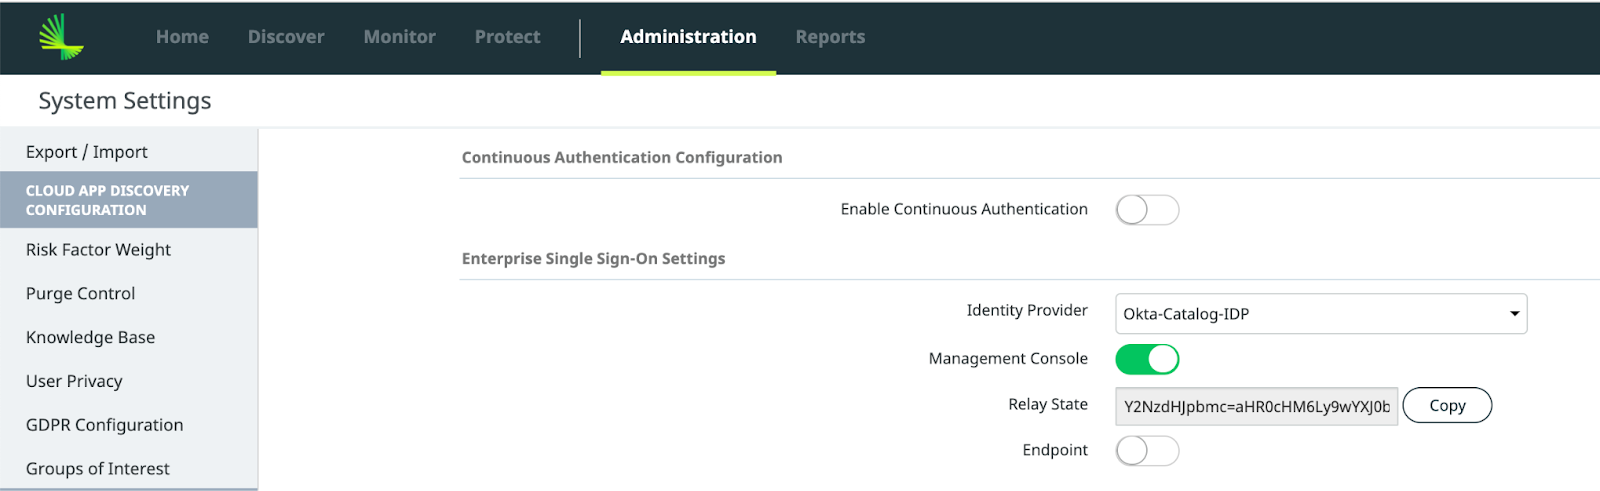
- In the Lookout Management Console, select Administration > System Settings > Enterprise Authentication
- From the Identity Provider dropdown, choose the Identity Provider you created.
- Enable the Management SSO, Endpoint by turning on the toggle.

- The Native Proxy Authentication toggle is enabled by default and cannot be disabled.
- Click Save
Configure IDP Initiated Login for Management Console
To setup IDP initiated login for Lookout Management Console, you must configure Relay state on OKTA.
- In the Lookout Management Console, select Administration > System Settings > Enterprise Authentication
- In the Enterprise Single Sign-on Settings, copy the Relay State value by clicking on the copy button.
- In the Okta administrative console, launch Lookout Secure Access app
- Click on the Sign On tab
- In the SAML 2.0 section, paste the Relay State value you copied from Lookout management console.
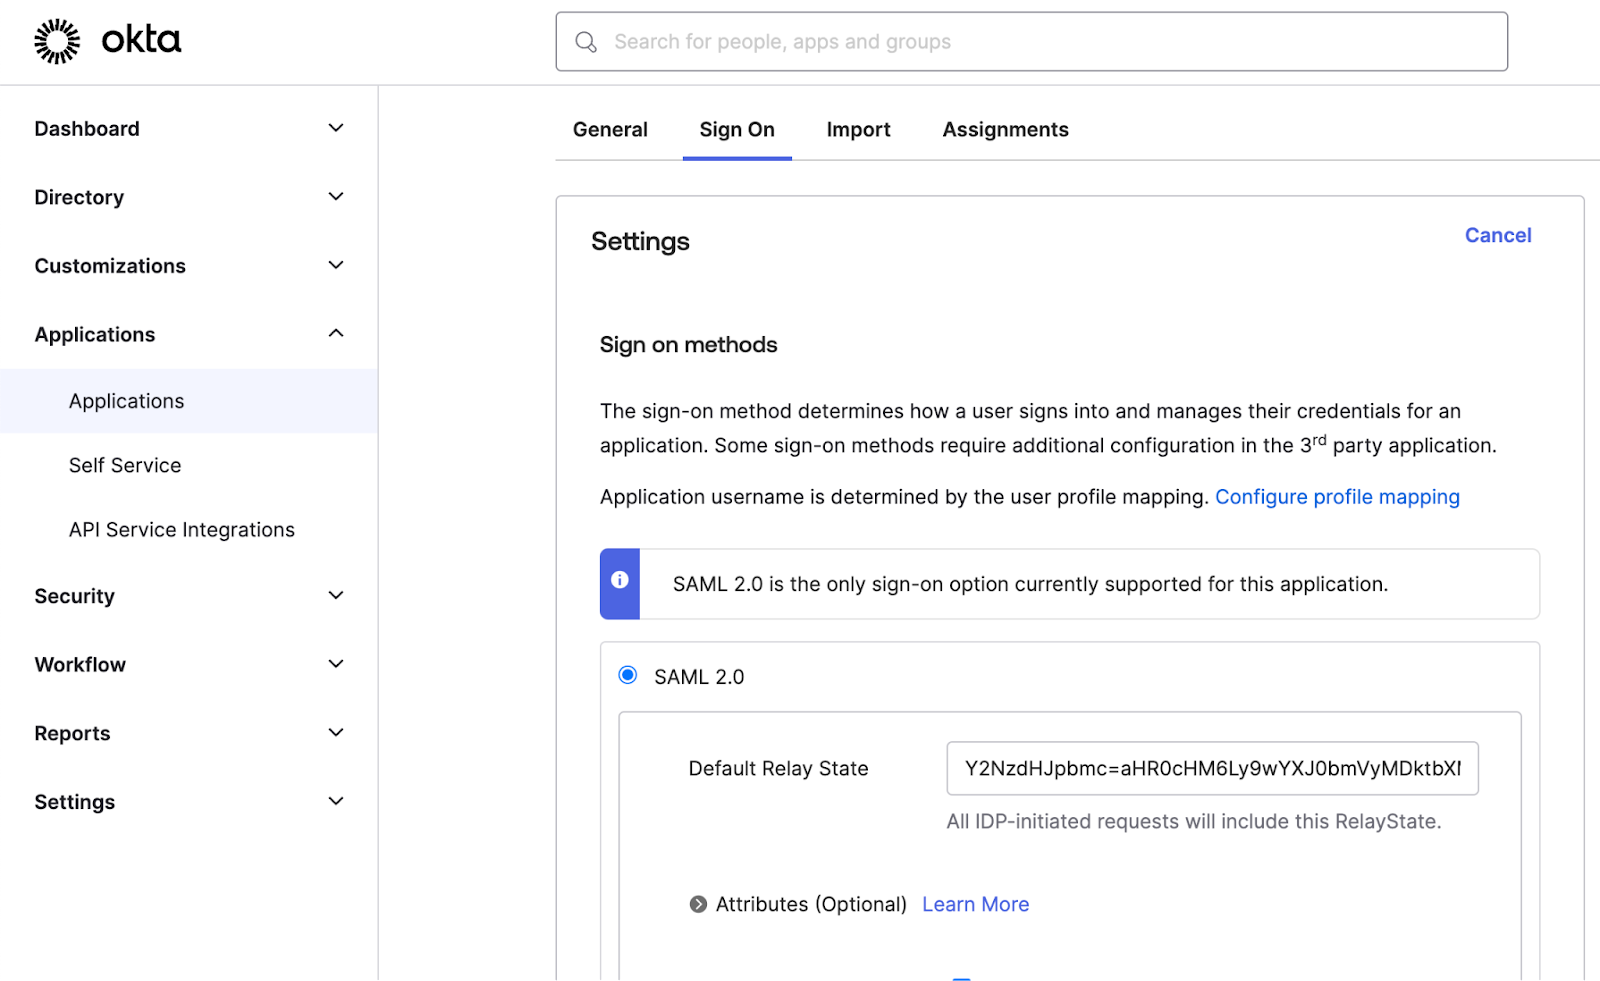
- Click on Save
SSO Configuration Guide for Ping Identity
Overview
Lookout Cloud Security Platform is a data-centric cloud security solution that protects your users from internet-based threats and protects data stored in cloud applications, private applications, and websites.
The solution supports these important components of cloud security:
- Lookout Secure Internet Access: Protection for web or nonweb internet-based traffic.
- Lookout Secure Private Access: Protection for private application traffic.
- Lookout Secure Cloud Access: Protection for cloud application traffic.
Supported Features
The Ping Identity and Lookout SAML integration currently supports the following features:
- SP-initiated SSO
- IdP-initiated SSO
Enable Enterprise Authentication
Users must authenticate with your enterprise single sign-on provider before you can make use of specific solutions such as Secure Internet Access or Secure Cloud Access. The Lookout Cloud Security Platform leverages the user or user group context to enforce access and activity policies on cloud apps, private apps, and websites.
Gather Service Provider Metadata
To use Ping Identity as an identity provider (IdP), you must capture SAML values from Lookout.
- In the Lookout Management Console, select Administration > Enterprise Integration.
- In the Configuration menu, select Single Sign-On.
- On the SSO Groups tab, click on the download icon of the SP Metadata from the Default group.
- A pop-up appears with SP Metadata details
- Copy the Assertion Consumer Service (ACS) URL and Entity ID

Configure the Identity Provider
Creating a SAML-based application in Ping Identity gives Ping Identity the information it needs to communicate with the Lookout Cloud Security Platform, enabling the platform to enforce policies based on user credentials.
- In the Ping Identity administrative console, select Applications > Application Catalog.
- Search for Lookout Secure Access
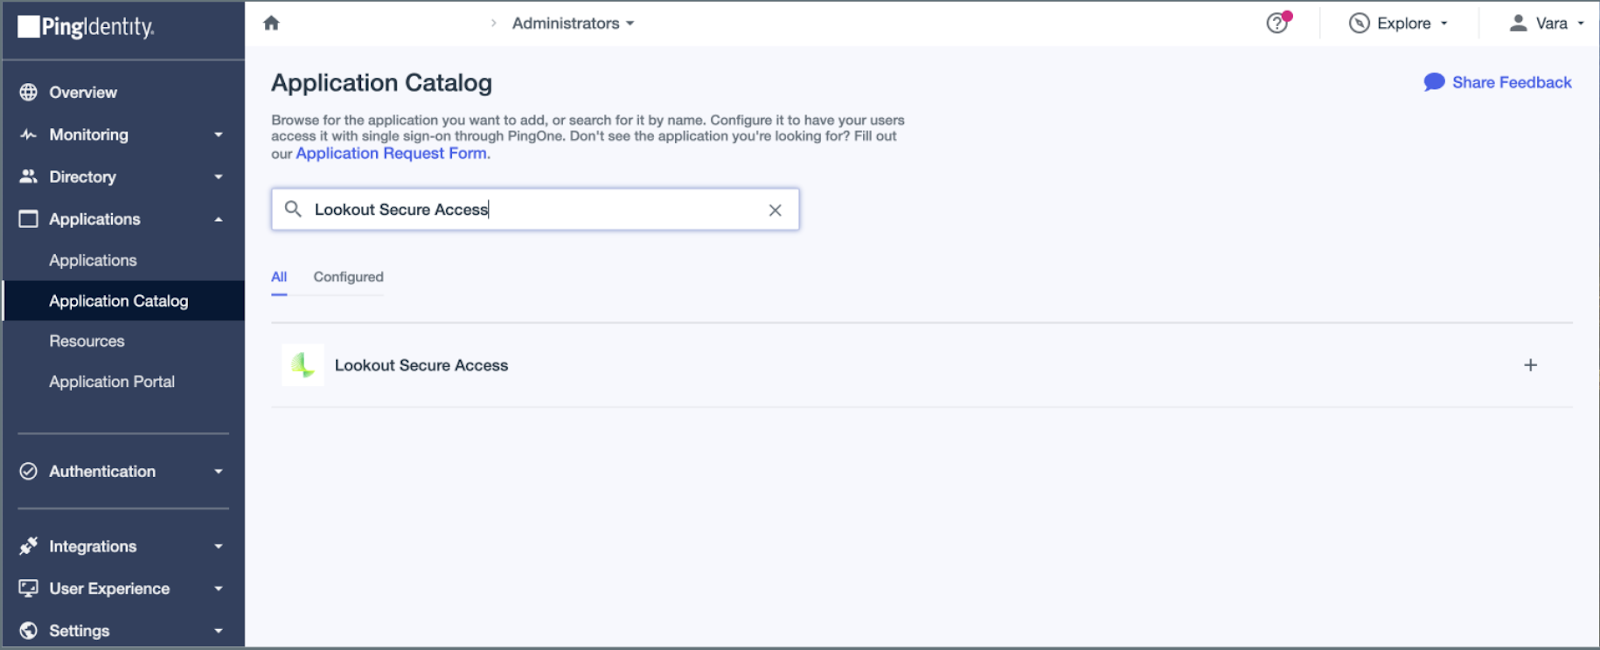
- Click on Lookout Secure Access
- Click on the + icon to add Integration
- On the Quick Setup step, configure these values:
- ACS URL: Enter the Assertion Consumer Service value you copied earlier
- EntityID: Enter the Entity ID value you copied earlier
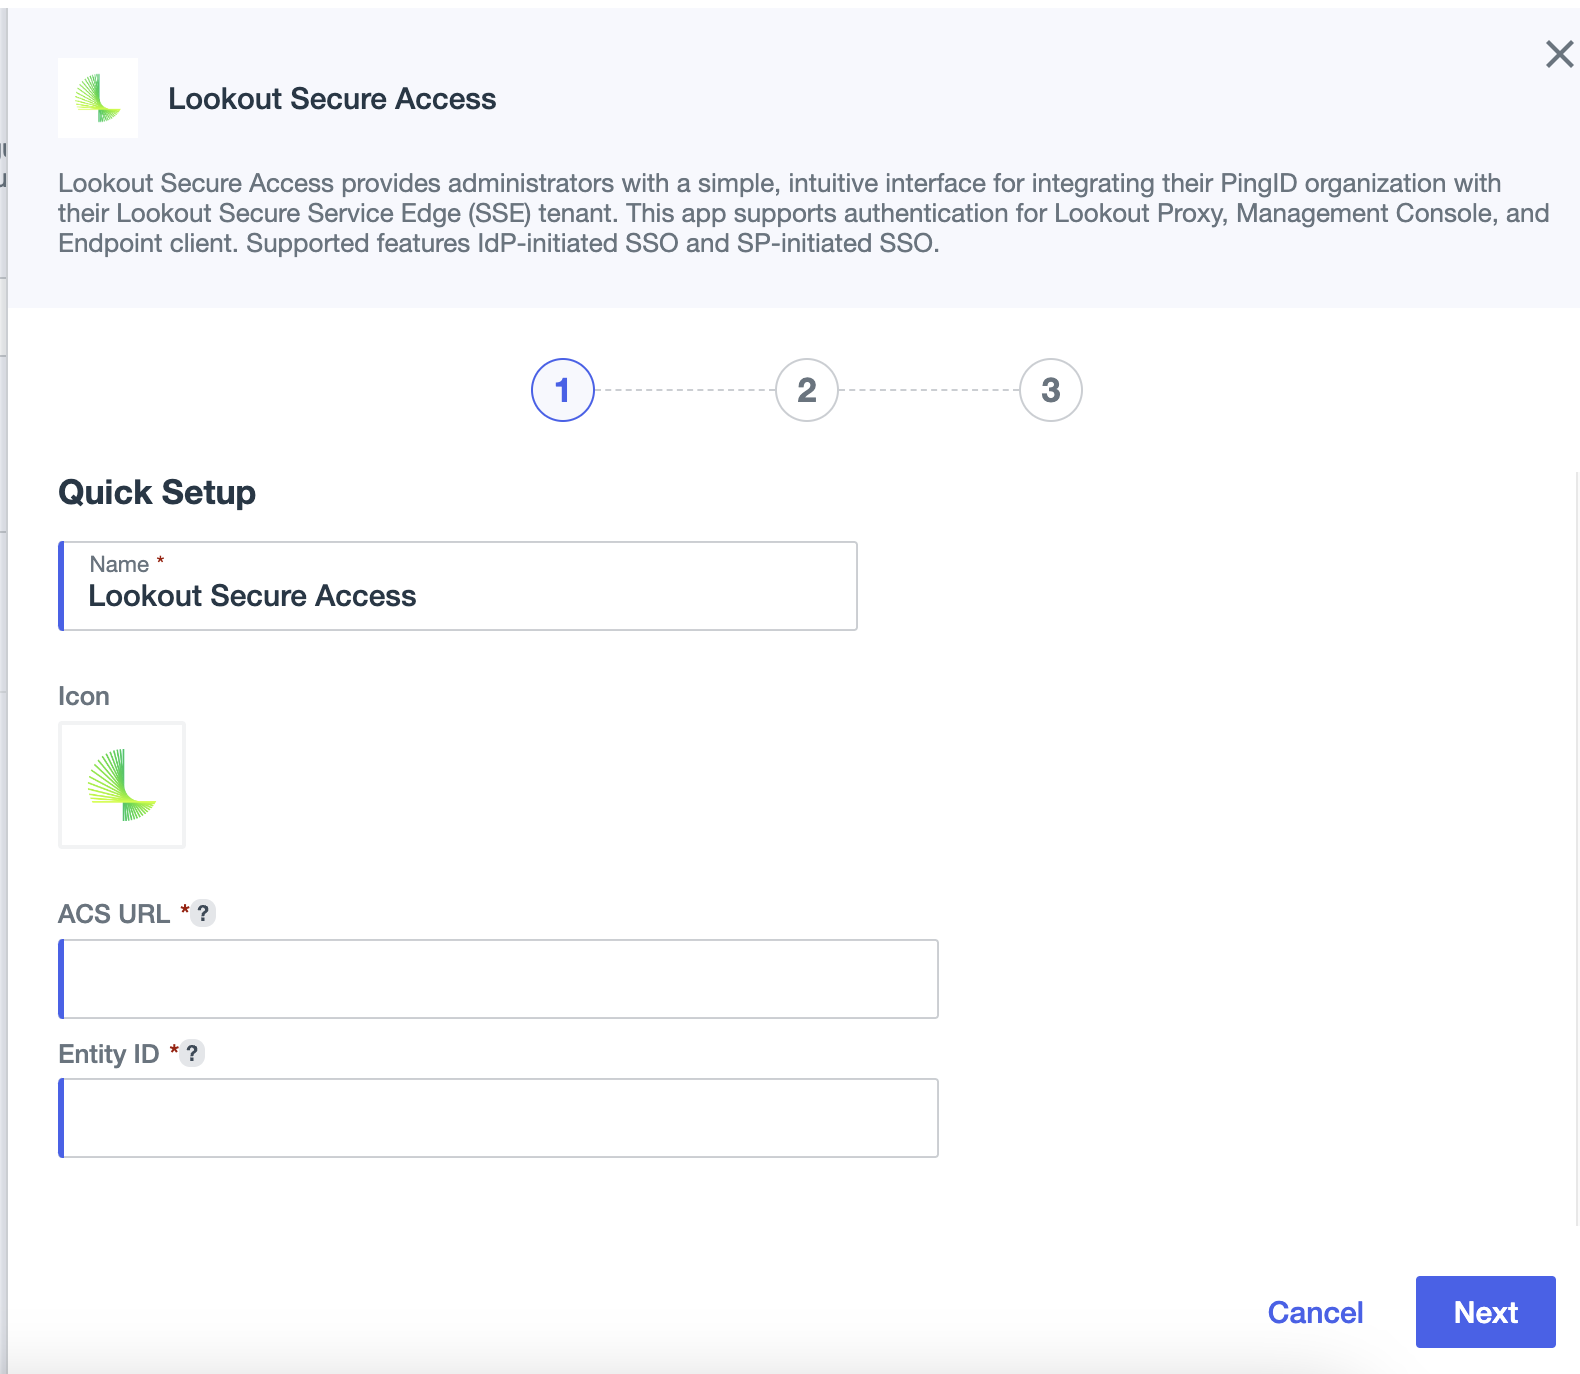
- Click Next
- On the Map Attributes step, Click Next
- On the Select Groups step, Click Save without assigning groups to allow all users to have access to this application by default.
- Note: Assign groups to the application to restrict access to only those groups.
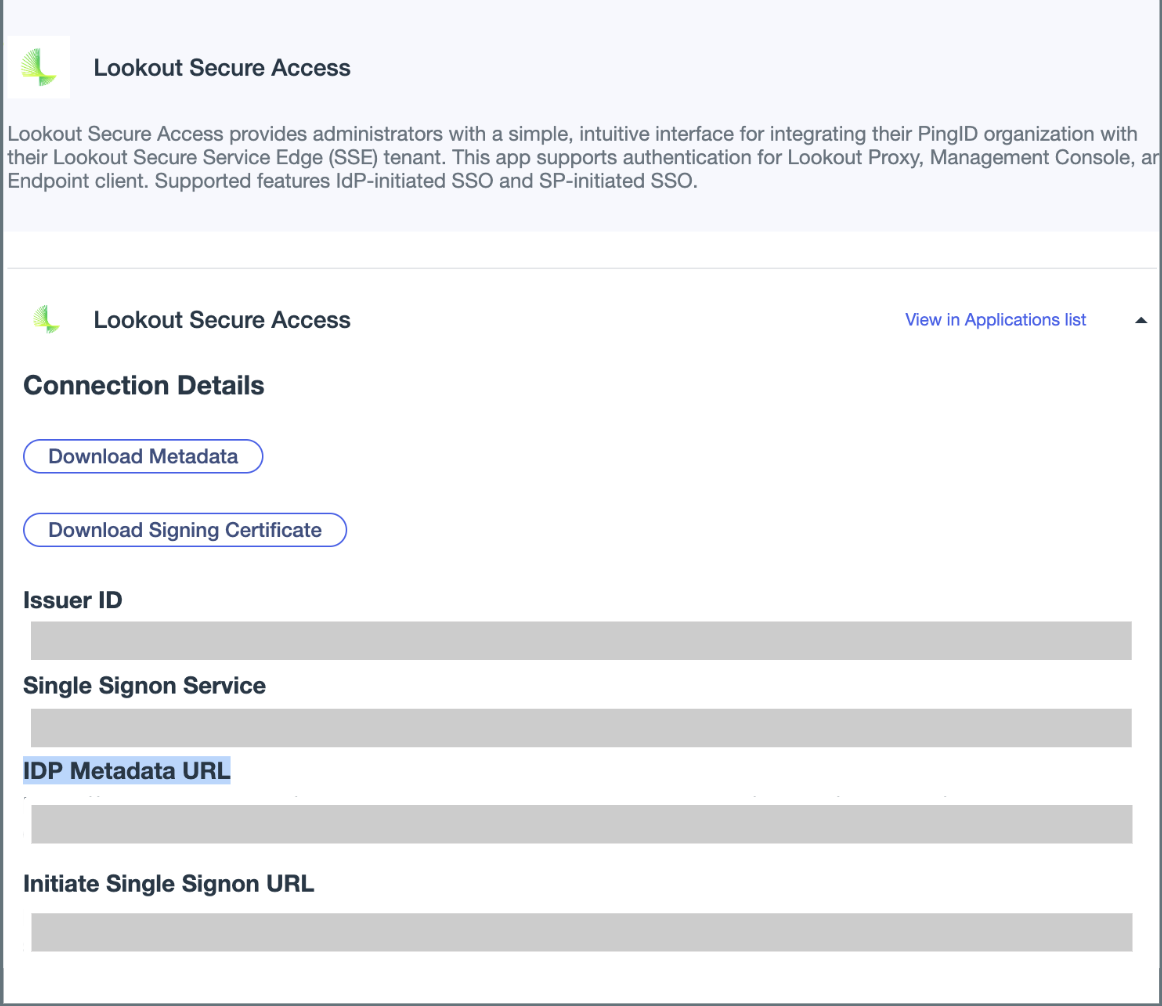
- Select the Lookout Secure Access Application entry to view the Connection Details
- Within the Connection Details, copy the IDP Metadata URL to use later.
Configure the Service Provider
You must link your Ping Identity instance to the Lookout Cloud Security Platform by configuring a new IdP instance, which Lookout uses to retrieve user information from Ping Identity.
- In the Management Console, select Administration > Enterprise Integration.
- In the Configuration menu, select Single Sign-On.
- On the SSO Providers tab, click New.
- Enter or select these values:
- Name: Enter a name that contains no more than 255 characters.
- Type: Identity Provider
- SSO Group: Default
- Metadata Link: Paste the IDP Metadata URL copied from the Ping Identity
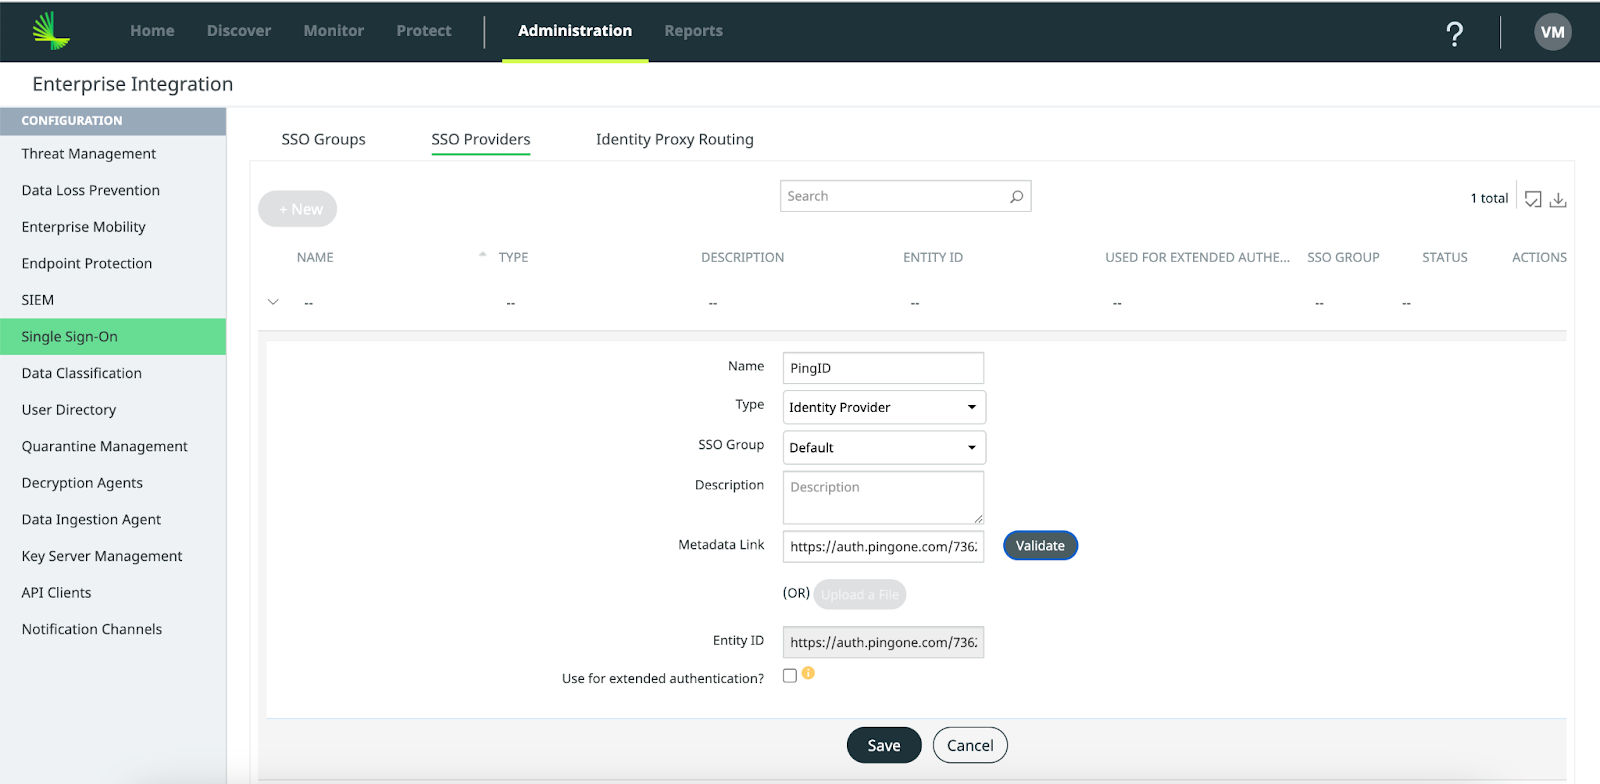
- Click Validate and confirm that the Management Console populates the Entity ID field.
- Click Save.
Note: Ensure that the STATUS column in the list view indicates a "Processed" status with a green check mark for the entry you've created.
Enable SSO for the Management Console, Endpoint client, and Proxy Authentication
- In the Lookout Management Console, select Administration > System Settings > Enterprise Authentication
- From the Identity Provider dropdown, choose the Identity Provider you created.
- Enable the Management SSO, Endpoint by turning on the toggle.

- The Native Proxy Authentication toggle is enabled by default and cannot be disabled.
- Click Save
Configure IDP Initiated Login for Management Console
To setup IDP initiated login for Lookout Management Console, you must configure Relay State on Ping Identity.
- In the Lookout Management Console, select Administration > System Settings > Enterprise Authentication
- In the Enterprise Single Sign-on Settings, copy the Relay State value by clicking on the copy button.

- In the Ping Identity administrative console, launch the Lookout Secure Access app
- On the Overview tab, Click on the Enable Advanced Configuration button
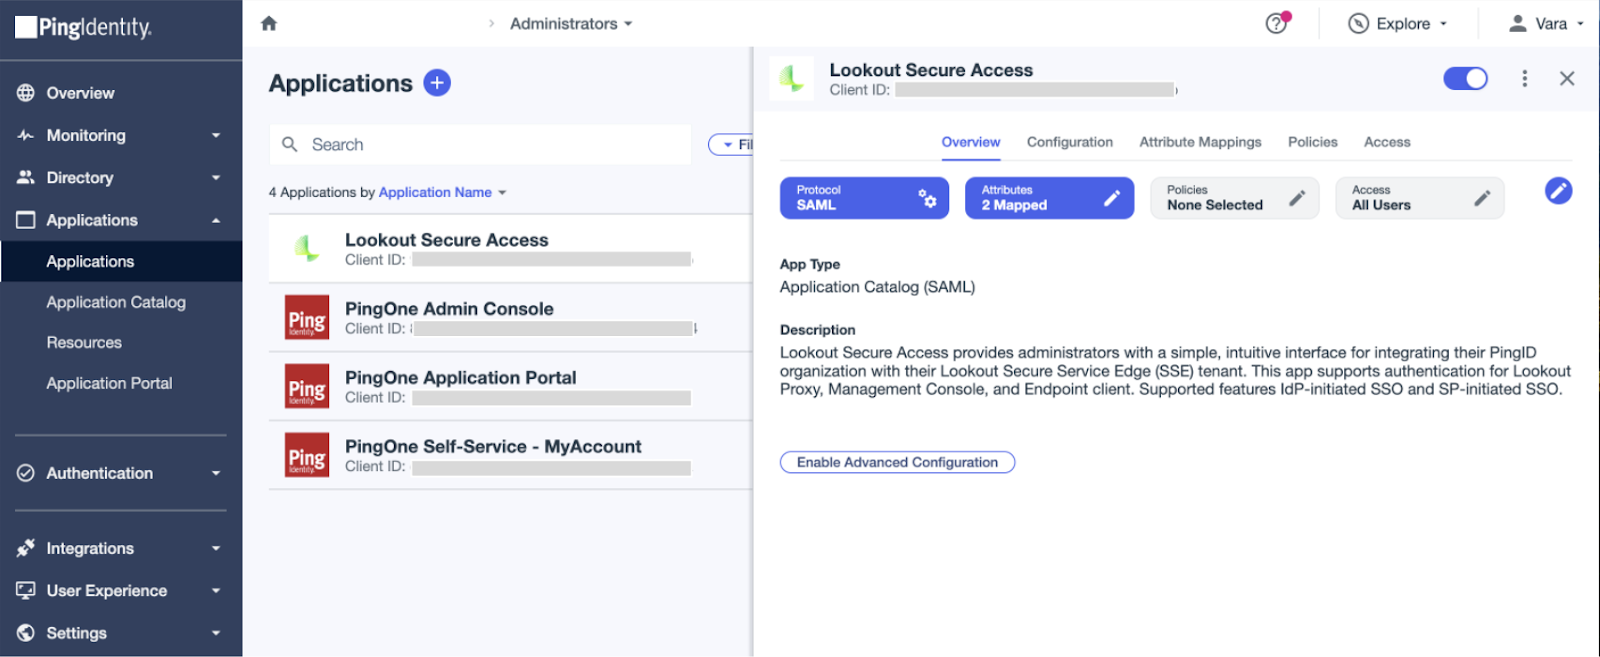
- Click Enable on the Enable Advanced Configuration popup
- On the Configuration tab, Click on the Pencil icon to edit the Connection Details
- In the Target Application URL field, paste the Relay State value you copied from the Lookout Management Console
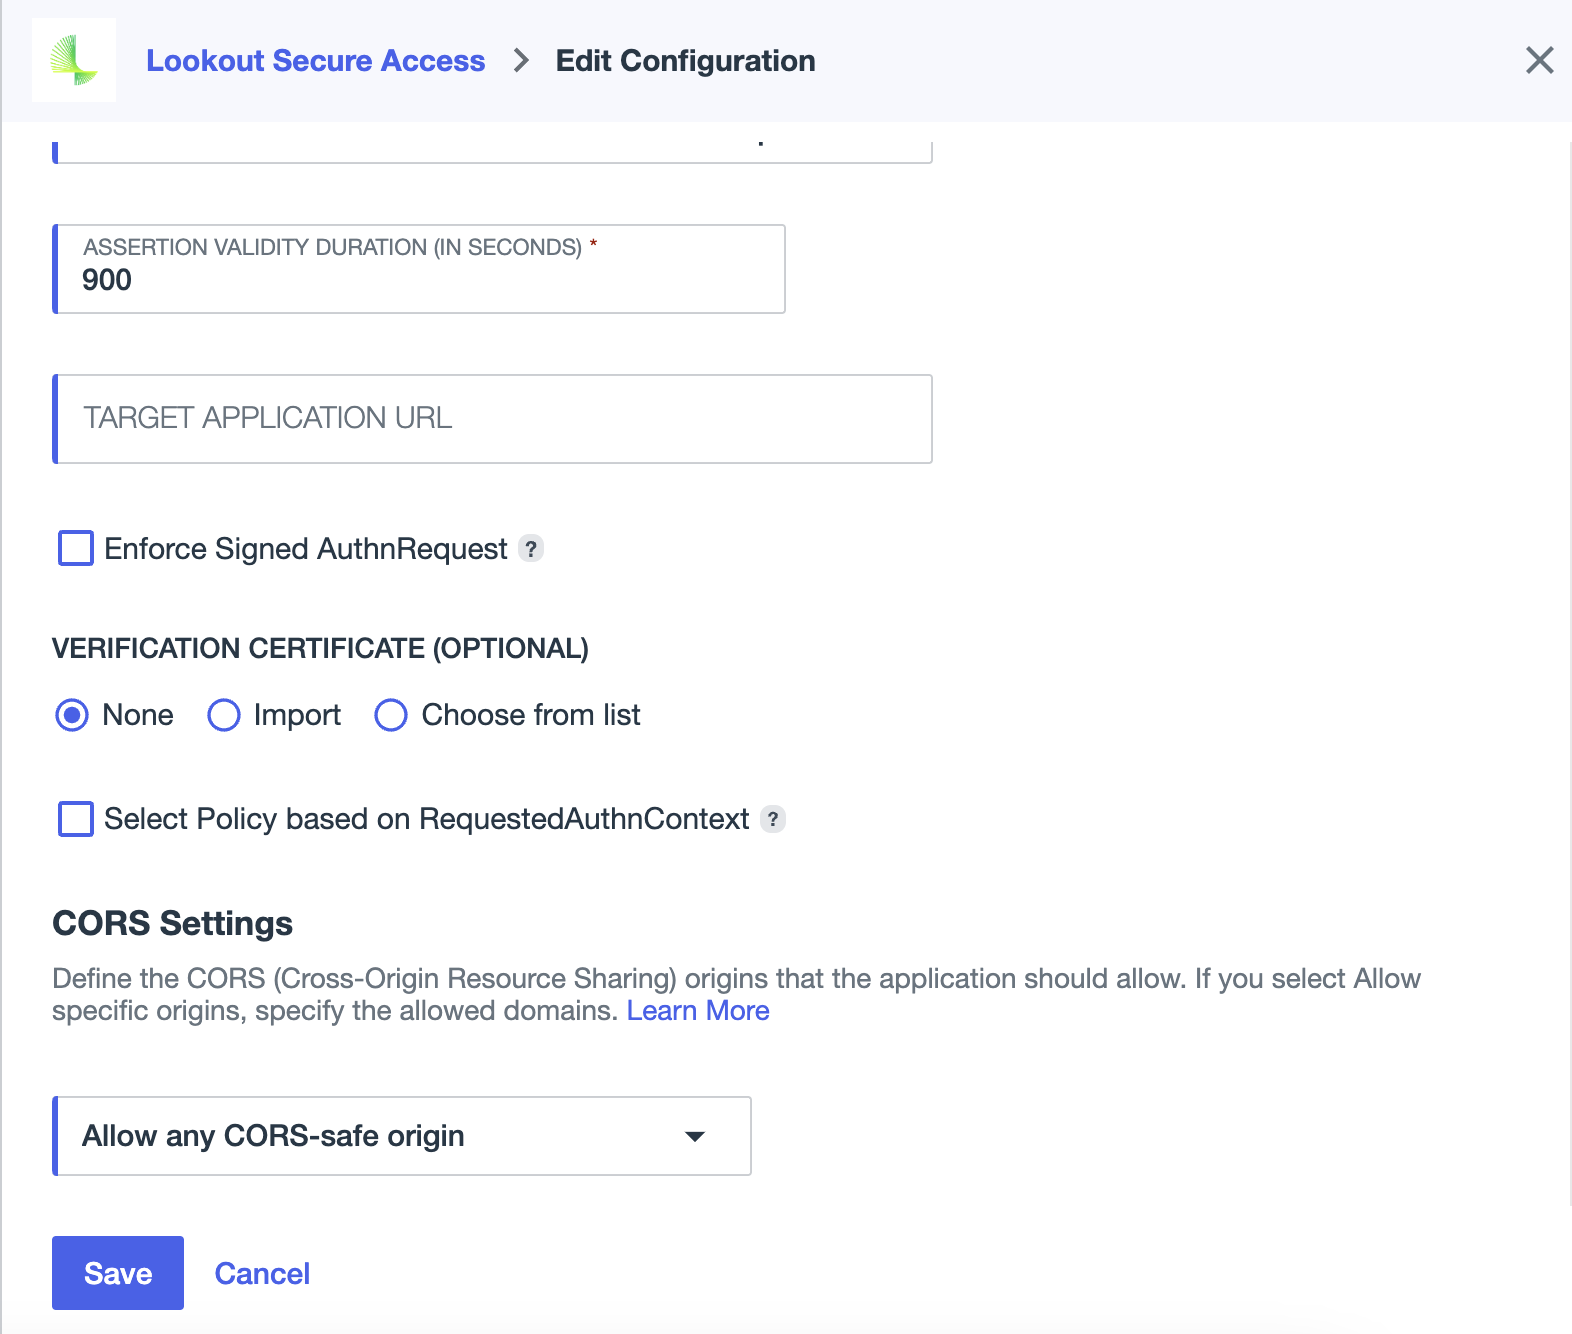
- Click Save
Test Single Sign-On with Lookout Secure Access
Verify whether single sign-on functionality is operational
- In the Ping Identity administrative console, launch the Lookout Secure Access app
- On the Configuration tab, copy the Initiate Single Sign-On URL
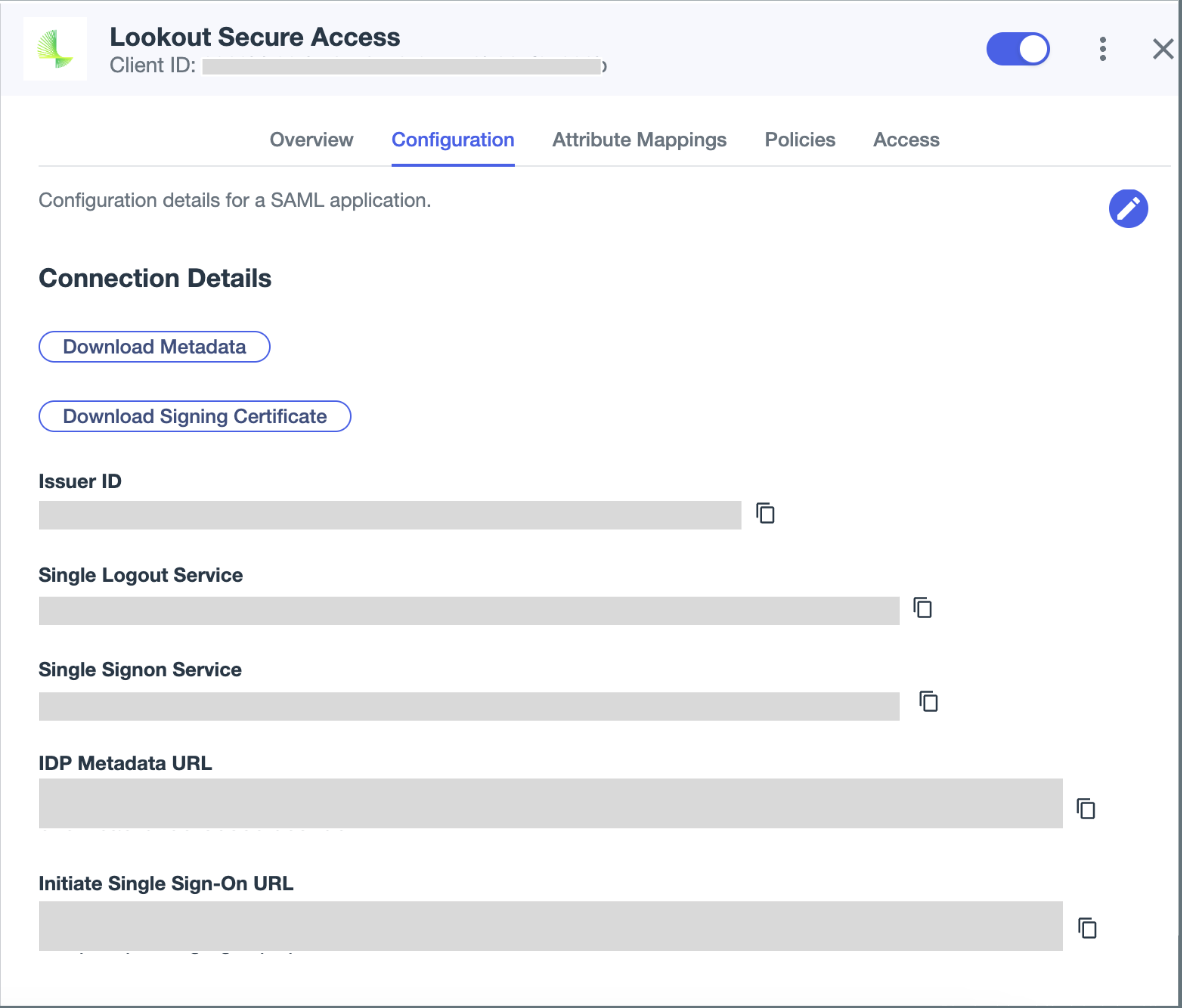
- Paste the URL in a new window and hit Enter
- You should be redirected to the Lookout Management Console successfully